Showing posts with label Pork. Show all posts

Sunday, November 20, 2011

Homemade Bacon (Sugar-Free)

Ingredients
1lb Pork Belly, skin removed*
2 T. Barbecue of the Americas (use your favorite seasoning blend)
1 tsp. Smoked Sea Salt (I used #41, from Salt-Farm)

*Mine still had skin on, but you could ask for it to be removed for you. If the skin is still on, make sure you have a super sharp knife and be careful not to remove too much of the fat. Once removed, if you're feeling adventurous, sprinkle the skin with a little sea salt and bake (on a cooling rack-lined baking sheet) at 350F for about an hour or until crispy. Enjoy!
  1. Mix spices in a small bowl and set aside.
  2. Place pork belly in a large plastic bag. Add seasoning mix to the bag and rub into belly, to coat. Seal bag, making sure to squeeze out as much air as possible. 
  3. Transfer to the fridge and let it hang out for 7 days, flipping on day 4. 
One week later:
  1. Remove the pork belly from the fridge. 
  2. Preheat oven to 225F. 
  3. Place belly skin-side (side that once had skin) up on a baking sheet, fitted with a cooling rack.
  4. Roast until internal temperature reaches 145F. 
  5. Remove from the oven and let cool. 
  6. Once cooled, cover with plastic wrap and transfer to the fridge to hang out over night.
  7. Slice to desired thickness and cook (I like to bake mine, using a foil-lined baking sheet and cooling rack. Bake at 375F until cooked to your desired doneness). 


I found recipe inspiration for this bacon in one of my favorite cookbooks, Primal Cuts (p. 232-233).

Saturday, July 2, 2011

Pork Breakfast Sausage

Ingredients:
1lb Ground Pork (feel free to substitute another ground meat)
1 T. Garlic Powder
1 T. Ground Fennel
1 T. Dried Sage
1/2 T. Smoked Paprika
1/2 T. Chipotle Chile Powder
1 tsp. Italian Seasoning
1 tsp. Sea Salt
1/2 tsp. Cinnamon
  1. Add seasonings to a bowl and mix to combine. 
  2. Add meat and use clean hands to incorporate seasoning mix into ground pork. 

Saturday, May 21, 2011

I Love My Baby Back Ribs...Grandma Shirley's Ribs

Makes 2-4 Servings
Ingredients:
5lbs Pork Baby Back Ribs (about 2 racks)
1- 22oz Bottle of Hard Apple Cider (I used and LOVE Honey Crispin, but use your favorite)*

1/2 C. BBQ Sauce (I used "Austin's Own", which contains sugar, but use your favorite)**
~or~
1/4 C. Whole9 Coffee Rub (I'm pretty sure that this rub would taste good on anything...LOVE it!!!)

From Whole9's Facebook Page:
1 tsp black peppercorns
1 tsp whole coriander
1 tsp sea salt
1/4 tsp ground cloves
1/2 tsp cinnamon
1/2 tsp unsweetened cocoa
1/2 tsp raw sugar (optional)
1 tsp freshly ground coffee

Covers two average steaks. We recommend making more. You'll want more. 
Adapted/improvised from Cree LeFavour's "The New Steak."

*This recipe is something that my grandma used to make...she used a light beer, like Coors Light. In my pre-Paleo days, this is how I would make this recipe, but have found that I actually like this version much better. Though I wouldn't consider hard cider to be healthy, it's a great way to tenderize the meat and add a little sweetness without the gluten (always be sure to check your labels!). You can also use pure apple juice, as an alternative.

**A few options for Paleo-friendly BBQ sauce are here, here, and here.

  1. Preheat oven to 415F.
  2. Add ribs, meaty side down, to a dutch oven*** (I cut mine in half, giving me four rib sections) and cover with hard cider; they do not need to be completely immersed, as they will steam. Cover with a lid and transfer to the preheated oven. 
  3. Cook the ribs for 4.5 hours (check after 2 hours, to make sure that there is still liquid in the dutch oven); the meat will plump up a bit and will begin to fall off the bone.
  4. Remove from oven and transfer ribs to a large plate or platter.****  Paint the meat-side of the ribs with BBQ sauce or rub with the Coffee Rub and set aside. 
  5. Prepare your charcoal or grill (I use hickory wood chunks, when barbecuing ribs, but use what you've got). I've also recently begun using a Traeger, to heat to temperature and then smoke the already cooked ribs...SO GOOD!!!
  6. Once your grill is ready (I wait until my charcoal or wood is grey) transfer the ribs to your grill, meat-side up and put a lid on it. Cook the meat for 10 minutes. 
  7. Flip the ribs and cook for another 5-7 minutes, but check after 3 to ensure that they are getting a good char...not burning. 
  8. Remove from the grill and serve with your favorite side. I made a salad with mixed baby greens, yellow bell peppers, and a vinaigrette of lemon juice, hazelnut oil, olive oil, smoked paprika, and sea salt.
***You can also use a crock pot for this step; I've never done so, but am sure that it would work just as well. Follow your crock pot's instructions. 
****You can cool the ribs and store in the fridge, for up to two days, at this point. Just be sure to take them out of the fridge about 30 minutes before you plan to grill them, so that they're not going on the grill cold...they're more likely to burn while you try to get them reheated. 


Wednesday, March 2, 2011

Bacon-Wrapped Meatloaf (Paleo Meat Log)


Ingredients:
6 Slices of Thick Cut Bacon

*If you can't find a breakfast sausage without added junk, use ground pork. To the ground pork, add a pinch each of:
-Dried Sage
-Dried Ground Fennel
-Red Pepper Flakes

Saturday, January 29, 2011

Breakfast Squash

Ingredients:
2 Delicata Squash, cut in half and deseeded
1T. Coconut Oil
1 tsp. Ground Cinnamon
1/2 tsp. Sea Salt
6oz Ground Pork Breakfast Sausage (you can use any ground meat you like, just make sure it's flavorful)
4 Eggs, whisked (I use a blender to whip air into mine, but a bowl and whisk work just fine)
Ground Fennel and Fennel Fronds, for garnish (optional)

  1. Preheat oven to 415F.
  2. Place squash on a baking sheet, skin-side down.
  3. Evenly distribute the coconut oil amongst the four squash halves and transfer the baking sheet to the oven to melt the oil, about 15 seconds.
  4. Remove the sheet from the oven  and spread the oil to coat the flesh of the squash (I use a pastry brush). Sprinkle each squash half with sea salt and cinnamon, evenly distributing the mixture. 
  5. Place the sheet back in the oven and bake until squash is tender, about 15-20 minutes.
  6. While squash is roasting, brown sausage and set aside. 
  7. Remove from oven and fill or let cool and refrigerate for future use.  
  8. Turn oven temperature down to 375F.
  9. Fill each squash with about 1.5oz of the browned sausage, to fill evenly.
  10. Top with whisked eggs and transfer back to the oven. 
  11. Bake until eggs are puffed slightly and cooked through, about 10-15 minutes. 
  12. Sprinkle with ground fennel and fennel fronds or your favorite seasoning. Enjoy!
 

Steps 1-7 can be done in advance, making breakfast super simple to create. Just let the squash and meat cool, before storing in the fridge until ready to use (I would say up to a few days).

Wednesday, January 26, 2011

Bacon-Roasted Cauliflower

Ingredients:
Head of Cauliflower, cut into florets
1T. Bacon Fat or Olive Oil or Coconut Oil
3 Pieces of Bacon, cut into 1" slices
1T. Bay Seasoning (you can also use Old Bay Seasoning or your favorite spice blend)
Chopped Parsley, for garnish (optional)
  1. Preheat oven to 425F.
  2. Add cauliflower to a bowl and toss with oil, to coat.
  3. Add seasoning and toss, to coat. 
  4. Add bacon and toss. 
  5. Spread cauliflower mixture onto a baking sheet and transfer to preheated oven. 
  6. Bake about 25-30 minutes, until bacon is crispy and cauliflower is browned. 
  7. Sprinkle with parsley to garnish, if using. 

Monday, January 17, 2011

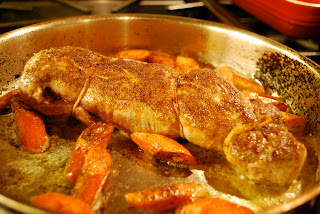
Tagine Spice-Rubbed Pork Tenderloin w/Cinnamon-Bacon Pears

Ingredients:
12oz Pork Tenderloin (I tie up the little ends, to make the tenderloin the same size throughout)
3 Carrots, peeled and sliced 1" thick
1T. Coconut Oil
1T. Tangine Spice (recipe follows)
1/4 tsp. Sea Salt
1/2 Pear, sliced into small pieces lengthwise and then horizontally 
1/2 tsp. Ground Cinnamon
3T. Bacon Slices*
Squeeze of Fresh Orange (about 1T.), optional
Fresh Parsley (for garnish), optional

*Remember those bacon pieces you cooked up and have sitting on your counter? You didn't eat them...did you!?
  1. Preheat oven to 415F.
  2. Heat an oven-proof saute pan over medium-high heat. Add coconut oil to heated pan.
  3. Add carrots and toss to coat. Sprinkle with seasoning.
  4. Season the pork tenderloin with spice rub and sea salt and transfer to heated pan. You'll need to move the carrots to the side of the pan, to make space in the middle for the pork.
  5. Brown the pork on one side, about 5 minutes, and then flip. Transfer the pan to the preheated oven.
  6. Cook the pork and carrots until done (remember that it will continue to cook once you take it out of the oven to rest), about 20 minutes. 
  7. Remove the pork and carrots from the pan and set aside to rest. 
  8. Move the pan to a burner and turn on the heat to medium (be careful...the pan and handle will be HOT!). Add the sliced pears and bacon pieces to the pan and sprinkle with cinnamon. If your pears aren't very sweet, add a squeeze of fresh orange juice to the pan. Cook until tender, about 7 minutes.
  9. Slice the pork and serve topped with the pears. If the carrots aren't hot enough, at this point, add them to the pan, toss, and reheat, about 1 minute. 


This another recipe that I created using ingredients that I had on-hand. I think that this would be really good with yams. I'd also like to try it with blueberries, instead of pears, as was recommended by my friend, Juli. And, really...you could just use cinnamon and cayenne in place of the Tangine Spice or a little cocoa powder, cinnamon, and ancho chili powder...I just love the combination of salty bacon with the spicy-sweetness of the cinnamon and the sweetness of the fruit (in this case, pears). So, get creative. 

Tagine Spice Rub:

Ingredients:
2 teaspoons paprika 
1/4 teaspoon ground turmeric 
1/2 teaspoon ground cumin 
1/4 teaspoon cayenne pepper 
1 teaspoon ground cinnamon 
1/4 teaspoon ground cloves 
1/2 teaspoon ground cardamom 
1 teaspoon kosher salt 
1/2 teaspoon ground ginger 
3/4 teaspoon garlic powder 
3/4 teaspoon ground coriander


I didn't want to fork over the money to buy a pre-made spice mix, knowing that I had all of the ingredients in my cupboard to make my own. So, I found a mix that I wanted to buy and then searched the internet for one that sounded pretty close. This is the one I found...adjust to your taste or just trust me when I say this is really good! :)

Tuesday, January 4, 2011

Crab and Avocado Salad w/Grapefruit


Ingredients
Lump Crab (6oz)
Avocado  (1/2 Large)
Citrus Vinaigrette (3T.)

Above are the portions I used for my lunch; a snack would've been 1/4-1/2 of those amounts.

Citrus Vinaigrette 
(makes about 1/2 cup)

Juice of One Grapefruit (set aside segments for garnish)*
3T. Avocado Oil (if you don't have Avocado Oil, use all Extra Virgin Olive Oil)
1T. Extra Virgin Olive Oil
1T. Dijon Mustard
1T. Seafood Bay Seasoning**

Whisk all ingredients until combined.


If you don't have "Bay Seasoning", use what you've got on-hand. Remember, a vinaigrette doesn't need a recipe...the standard is:
  • Acid (Vinegar or Citrus)
  • Oil 
  • Seasoning
  • Mustard and/or Egg (like in Caesar) will help to emulsify, but is not necessary
Mix together until it tastes good. Easy!


This is one of those "recipes" that I threw together using ingredients that I had on-hand. This salad can also be served over a bed of lettuce to add some crispy texture to the mix. You might also make the following substitutions (if you don't have or like crab):
  • Shredded Chicken (leftover roasted or rotisserie would be perfect) w/Orange or Lemon in place of the Grapefruit
  • Shredded Pork w/Orange in place of the Grapfruit and a mix of Chile Powder, Cumin, and a drop of Raw Honey in place of the Bay Seasoning
I made this look nice for my "photo shoot', but really just ended up smashing it all together to eat. So, throw it all in a bowl, smash it up, and enjoy or create a photo-worthy snack/meal...it'll taste the same. But, when you have the extra few minutes to garnish...do it. It'll make the receiver, whether it's just for you or your family, feel like they're getting something really special...even if it only took a few minutes to create.

Sunday, December 5, 2010

Sausage and Vegetable Stuffed Delicata Squash

Serves 2+
Ingredients
Squash:
1 Delicata Squash (you can use acorn, or another small winter squash), halved and seeded
1T. Coconut Oil
1/2tsp. Sea Salt
1tsp. Ground Cinnamon (optional)

Stuffing:
1T. Coconut Oil
10-12oz of Ground Meat (I used a combination of pork sausage and buffalo)
1/2 Small Onion, chopped finely
1 Garlic Clove, minced
1 cup Finely Chopped Vegetables (I used a combination of zucchini and cauliflower, pulsed in my mini chopper)
1/4 cup Fresh Herbs (I used parsley and thyme), finely chopped, plus more for garnish
Sea Salt and Black Pepper, to taste
1 Egg, lightly beaten

4 Bacon Slices, sliced into 1/2" pieces

Roasting the squash:

  1. Preheat oven to 400F.
  2. Transfer squash to a baking sheet, coat with 1T. coconut oil, and season with cinnamon and salt. 
  3. Bake for 30-45 minutes, until soft.

While squash is roasting, make stuffing:

  1. Heat a saute pan, over medium-high heat. Add coconut oil and meat. Cook meat until browned. 
  2. Add onion, garlic, and vegetables and toss to coat. Cook until all vegetables are softened, about 5-7 minutes. Season with salt and pepper, to taste. 
  3. Add fresh herbs and stir to combine. Remove from heat and set mixture aside to cool slightly. 
  4. Add egg and stir to combine. 
  5. Fill squash halves with mixture, top with bacon slices, and return to 400F oven (I cooked the squash on a cake/cookie-drying rack, but this is not necessary). Bake for 40-45 minutes, until bacon is browned and mixture is cooked through. 
  6. Garnish with fresh herbs and serve.


This squash was filled and then refrigerated overnight, so that all I had to do was bake.
I roasted the squash in the morning, while my oven was still hot from my frittata; I let the squash cool and then put them in tupperware and into the fridge. My stuffing was something that I created for frittatas and was also in the fridge...I just added an egg to help it bind during baking. You can create any sort of mixture for your "stuffing" and can make extra to throw into your frittatas or scrambles for the week. 

Friday, November 26, 2010

Wrapped and Stuffed Chicken Breast

Serves 1-2

1- 12oz Chicken Breast, pounded to 1/2" thickness
6 Bacon Strips
Caul Fat (about 12" in diameter)
Handful of Fresh Baby Spinach, chopped 
3 Asparagus Spears, thinly sliced
1 T. Thinly Sliced Fresh Basil
1 oz Goat Cheese (optional)
Black Pepper, to taste
  1. Slice one piece of bacon, into 1/2" slices and add to a heated saute pan. Cook bacon until fat is rendered and bacon is crispy. Add spinach and asparagus and toss to coat. Cook until spinach is slightly wilted, about 1 minute. Set aside and let cool.
  2. Lay a large piece of caul fat out on a flat, parchment paper-lined work surface. Lay 4 bacon slices in the middle, slightly overlapping, and one bacon slice perpendicularly (to cover ends of chicken breast). Arrange the chicken breast on top. Lay the spinach mixture, goat cheese (if using), and basil on the chicken, season with pepper, and roll it up, creating a neat even log. Wrap the bacon around each end, then fold the bacon that's underneath around the chicken. Wrap the caul fat in an even layer to create a smooth even log. Tie with twine to secure. Wrap in plastic wrap and refrigerate for an hour, or up to overnight.*
  3. Preheat oven to 400F 
  4. Heat an oven-proof saute pan over medium-high heat. Add olive oil to heated pan and transfer chicken breast to the pan. Cook on all sides (including the ends) to brown the bacon, about 15 minutes total, and then transfer the pan to the preheated oven. Cook chicken for 40 more minutes, turning the chicken every 10 minutes to cook evenly on all sides. 
  5. Remove from oven, transfer to a plate, and cover with foil to rest.
  6. If you're making broccoli or another veggie, toss to coat in the bacon fat (left in the pan) and return to oven, while the chicken rests (5-7 minutes).
  7. Remove the twine, slice, and serve. 

*This step isn't necessary, but will help the roll to stay tightly wrapped. 

I forgot to add the fifth bacon slice until after I took this picture...whoops.


I was going to cook the broccoli with the chicken, but it started to cook too fast.


Wednesday, November 17, 2010

Paleo Dressing/Stuffing...Depending on Where You Cook It.


Ingredients
3T. Ghee
2T. Olive Oil
1.5lbs Mushrooms (I used baby bellas), chopped
4 Celery Stalk, chopped
1 Leek, white and light green portions chopped
1lb Ground Sausage (It's all about the sausage, so use something good!)
1T. Fresh Thyme Leaves
1/4 cup Chopped Fresh Sage
1/4 cup Chopped Fresh Parsley, plus extra for garnish
1.5-2lbs Butternut Squash, cut into 1/2" cubes
Sea Salt and Black Pepper, to taste
1 cup Chicken Stock (I use homemade)
Turkey Neck (if you've got one from your bird)
  1. In a large fry pan over medium heat, heat the oil and ghee. Add the mushrooms, toss in oil to coat, and cook until browned, about 5-7 minutes. Add the sausage, leek, celery, sage, thyme, season with a little salt and pepper and cook, breaking up the meat into small pieces with a wooden spoon, until the meat browns and is cooked through and the vegetables are translucent, about 10 minutes. 
  2. Remove from the heat and fold in the butternut squash and parsley. Season with salt and pepper.
  3. Transfer mixture to a baking dish, add chicken stock, lay the turkey neck on top, and cover. Cook, covered at 375F for 1 hour and 1/2 hour uncovered, until squash is cooked through and liquid is mostly absorbed. 
  4. Serve with turkey and enjoy!